How to Verify Google Search Console Ownership via DNS TXT Record on ConoHa Wing
 Image credit: いらすとや
This guide explains how to verify a custom domain in Google Search Console using DNS TXT record verification, with ConoHa Wing as the example DNS provider.
ConoHa Wing is a Japanese web hosting provider. If you use a different hosting provider or DNS registrar, the steps for adding a TXT record will differ slightly, but the overall approach — copy the verification string from Google, add it as a TXT record in your DNS settings, then confirm — is the same everywhere.
What Is Google Search Console?
Google Search Console is a free website analytics tool provided by Google. Key features include:
- See how many times your pages appear in Google Search results (impressions)
- See how many clicks your pages receive from search results (clicks and CTR)
- Identify which search queries are bringing visitors to your site
- Monitor and fix indexing issues and crawl errors
If you run a blog or personal website, setting this up early gives you data that is hard to get any other way.
It is free to use with any Google account.
Setup Steps
This guide covers domain property verification on ConoHa Wing. If you manage your DNS elsewhere, the TXT record entry screen will look different, but the field values (Type, Name, TTL, Value) are the same.
1. Open Google Search Console
Go to Google Search Console and sign in with your Google account.
2. Select the Property Type
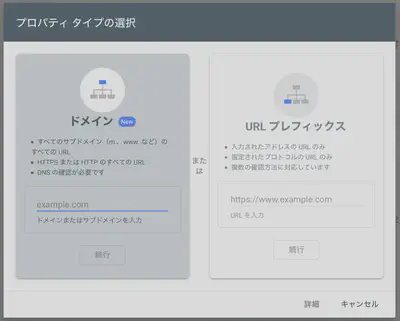
After signing in you will see the property type selection screen. Choose Domain and enter your domain name.
Choosing Domain (rather than URL prefix) lets Google Search Console aggregate data across all protocol and subdomain variants — http, https, www, and non-www — in a single property.
3. Copy the DNS Verification Code
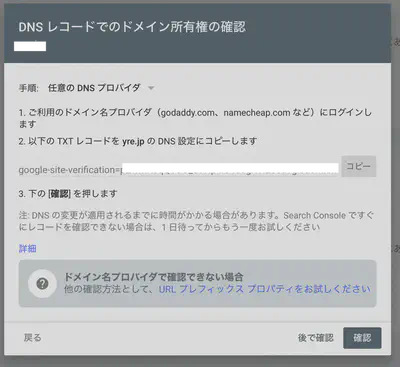
The “Verify domain ownership via DNS record” dialog will appear. Click Copy to copy the string beginning with google-site-verification=. You will paste this into ConoHa’s DNS settings in the next step.
4. Add the TXT Record in ConoHa Wing
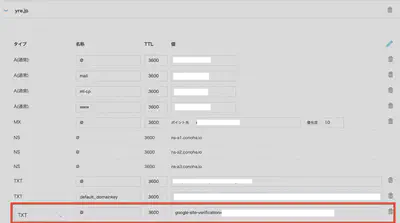
Log in to ConoHa Wing, navigate to Wing → DNS, and select your domain. Click + Add and enter the record as follows:
| Type | Name | TTL | Value |
|---|---|---|---|
| TXT | @ | 3600 | Paste the google-site-verification=... string |
Save the record.
5. Verify Ownership
Return to Google Search Console and click Verify.
If You See “Ownership Could Not Be Verified”
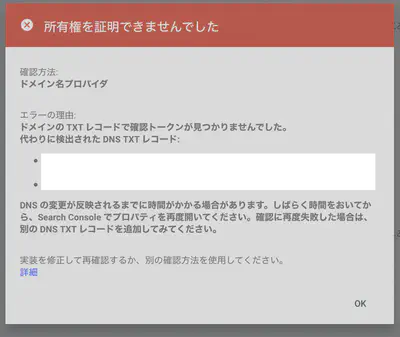
DNS changes take time to propagate across the internet (DNS propagation). It is common for verification to fail immediately after adding the record. Wait 10–30 minutes, then click Verify again.
When You See “Ownership Verified”
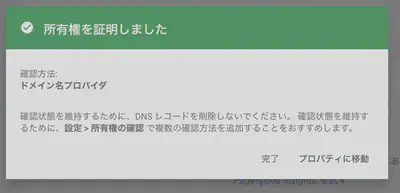
When this screen appears, the setup is complete. Google will begin collecting data for your site.
Summary
| Step | Action |
|---|---|
| 1 | Open Google Search Console and sign in |
| 2 | Add a Domain property and enter your domain |
| 3 | Copy the google-site-verification=... TXT value |
| 4 | Add a TXT record in your DNS settings (ConoHa Wing: Wing → DNS) |
| 5 | Wait 10–30 minutes, then click Verify |
After initial setup, it takes a few days to a week for meaningful data to appear in Search Console. Once verified, submitting a sitemap is a good next step to help Google crawl your site faster.
Tomokatsu Yukishita (雪下 智且)
Engineering Manager / Real Estate Transaction Agent
Engineering manager connecting embedded development with cloud and AI. I apply quality standards from mission-critical systems to modern product and development workflows.